Build your export with VS Code and PlatformIO
From the zip to a running board, for someone who has never opened VS Code.
This page is for the Arduino export, the zip with a platformio.ini inside. It
takes you through every click, once. Plan on about half an hour the first time, most of it
waiting while the tools download. After that, a build takes a minute or two.
Already know PlatformIO? The short version is on Flashing and configuration.
Never press New Project. The export is the project. The only way in is File > Open Folder... (step 3). PlatformIO's New Project wizard isn't needed for an export, and it has crashed the extension for members, who then had to restart VS Code and reinstall it.
1. Install VS Code
VS Code is a free code editor from Microsoft. PlatformIO runs inside it. Download it from code.visualstudio.com:
- Windows: the User Installer. Accept the defaults.
- macOS: the Universal zip. Drag Visual Studio Code into Applications.
- Ubuntu: the
.debfrom that page, installed withsudo apt install ./code_*.deb, orsudo snap install code --classic. Both are Microsoft's own. Builds called Code - OSS or VSCodium look the same, but they don't use Microsoft's extension store, so skip them.
On Ubuntu, two more things before the extension. PlatformIO needs Python's
venv module, which Ubuntu leaves out: run
sudo apt install python3-venv. And to let PlatformIO use the USB port, install
PlatformIO's udev rules,
then log out and back in.
2. Install one extension
Open VS Code. Click the Extensions icon on the far left, the four squares (marked A
below), or press Ctrl+Shift+X
(Cmd+Shift+X on a Mac).
Type platformio into the search box. You will see two:
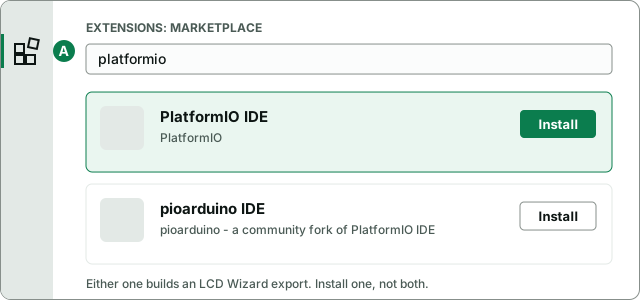
- PlatformIO IDE, by PlatformIO. The original.
- pioarduino IDE, by pioarduino. A community fork of PlatformIO IDE, made by the people who maintain the newer ESP32 Arduino support.
For an LCD Wizard export they do the same job. What matters is the
platform line inside the export's platformio.ini. On every ESP32 it
names one exact release of pioarduino's ESP32 platform, by its web address, and both extensions
download that address and build with it. So the PlatformIO-or-pioarduino question doesn't
change your build. Pick PlatformIO IDE if you have no reason to pick the other.
Install one, never both: they are two copies of the same tool, with the same buttons.
Click Install. A new icon appears on the far left, a round head with two antennae (marked B in the next picture). The first time, the extension sets itself up, which takes a few minutes: a message in the bottom-right corner says it is installing PlatformIO Core. When it asks to Reload or restart VS Code, do.
The name you see may be pioarduino, whichever one you installed. After an export has
been opened or built, PlatformIO's home screen and its icon can show pioarduino's name and logo
in place of PlatformIO's. Members have seen it with PlatformIO IDE installed alone. It comes from
the export's platform line, which is pioarduino's ESP32 platform, and it doesn't
change your build: the buttons, the steps and the result are the ones on this page. So the
drawings here may not match your screen word for word. Go by the buttons.
3. Open the project folder
Unzip the export somewhere with a short path. On Windows, C:\lw\ is ideal; the
Downloads folder inside a long OneDrive path is the worst place (see
a path that's too long). Inside the zip is one folder named after your
project.
In VS Code choose File > Open Folder... and pick the folder that has
platformio.ini directly inside it. It looks like this (yours may have a few more
files, depending on what the design uses):
MyUI/                <- open this folder
  platformio.ini     <- must be right here, not one level down
  MyUI.ino
  lcd_pins.h
  lv_conf.h
  partitions.csv
  README.md
  LIBRARIES.md
  src/
    ui/
      ui.c, ui.h, ui_Screen1.c ...
  data/              (only when the design has images on the filesystem)
If what you opened shows one folder and nothing else, you are a level too high. Windows'
Extract All does this: it makes MyUI and puts the project's own
MyUI inside it. Open the inner one.
If VS Code asks whether you trust the authors of the files, choose Yes: they are your own project. Otherwise PlatformIO is not allowed to run in that window.
You never choose a board. The export already names it. The board = line
in platformio.ini holds the board your design was made for, with its flash size,
PSRAM, partitions and libraries beside it. Don't pick one from PlatformIO's board list, and don't
make a new PlatformIO project. A list such as "Espressif ESP32-C6-DevKitC-1" beside
other ESP32-C6 boards is something you only see in PlatformIO's New Project wizard,
which you never need.
Here is the window with an export open, and the three buttons you will use. They are in the bar along the very bottom of the window, below the terminal. Its colour depends on your theme: grey, blue or purple. They are small icons with no words: a tick, an arrow and a plug. Hover over one and VS Code names it.

4. Wait for the first download
The first time you open an export, PlatformIO reads platformio.ini and downloads
what it names: the ESP32 platform, its compiler for your chip, the Arduino core, and every
library in lib_deps. That is several hundred megabytes. Expect
10 to 20 minutes, more on a slow connection. Later exports for the same chip reuse it all.
- It's busy while the bottom-right corner shows a progress message, or while a terminal named PlatformIO scrolls lines saying Installing or Downloading.
- It's done when the messages stop and the tick (1) and the arrow (2) are in the bottom bar. If you press Build before then, nothing is lost: the build does the downloading first, in the terminal, and then compiles.
Ignore the Problems count. VS Code may show a number of problems at the bottom (such as "16 problems") and red squiggles under names in the files. That is VS Code's own reading of the code (IntelliSense), which often doesn't find names the build finds, and it doesn't stop a build. The build output in the terminal is the only thing that counts: green SUCCESS means it built.
Don't close VS Code or put the PC to sleep during this download. A download cut off halfway leaves a broken compiler behind (see "is not recognized").
The libraries go into the project's own .pio folder, at the versions
platformio.ini names. Nothing else on your PC can upgrade or replace them, unlike
the Arduino IDE's shared libraries folder.
5. Build, then upload
- Build: click the tick (1). The terminal fills with Compiling lines and ends with a green SUCCESS. A red FAILED means it stopped: see When it goes red.
- Plug the board in with a USB cable that carries data. Charge-only cables are the most common reason a board is never found.
- Upload: click the arrow (2). It builds again if anything changed, finds the board's port by itself, and writes the firmware. It ends with SUCCESS and the board restarts into your design.
If the design has images in data/, they go up separately, once: click the
PlatformIO icon (B), open your environment's Platform group and click Upload
Filesystem Image. Uploading image assets
says why.
Changed the design since? Updating your project after a design change says what to copy over this folder. You don't start again.
Or flash with SerialWizard
If the board is on another PC, or the Upload button can't reach it, flash the build with
SerialWizard instead. The build is in
.pio/build/<env>/. The <env> part is the name in square
brackets in platformio.ini, such as esp32-c6-devkitc-1.
The .pio folder starts with a dot, so macOS and Ubuntu hide it in their file
managers, but VS Code's Explorer shows it.
- Easiest: drop the whole
.pio/build/<env>/folder onto SerialWizard's Flash tab. It recognises the bootloader, the partition table and the app from their contents and puts each at its own address. - One file:
firmware.factory.binat address0x0. This is everything in one image, for a new board or one that ran something else. It wipes what the board had saved, such as Wi-Fi details. - Just the app:
firmware.binat0x10000. This keeps the board's saved settings, but only works on a board already running an LCD Wizard export with the same partitions.
6. Watch the board's log
Click the plug (3) to open the serial monitor. It opens at the speed
platformio.ini sets, 115200. Press the board's RESET button to see the start from
the top. A good start prints your project's name with starting..., a line for the
touch controller and each device, then UI ready.
First boot explains each line.
Close the monitor before the next upload (click in the terminal and press Ctrl+C, or close its terminal tab). While it is open it holds the port, and the upload can't reach the board.
7. When it goes red
A failed build or upload ends in red. The useful part is near the bottom, so:
- Click in the terminal, scroll to the end, and copy the last 20 lines, starting a
little above the first line that says
error. - In the designer, click Report a problem (at the top of the designer, or in the export dialog), paste the lines, and say which board you have. Leave Attach this design ticked, so we can build exactly what you built.
The errors people meet most on a first build, and what fixes each:
A path that's too long (Windows)
What you see: a header that plainly exists is No such file or directory,
often one of LVGL's own, as if the library were broken.
Why: Windows refuses paths longer than 260 characters. A project in a deep folder, with
.pio\libdeps\... added inside, goes over.
Fix: move the project folder somewhere short, such as C:\lw\MyUI, open it
again and build.
"riscv32-esp-elf-g++ is not recognized"
What you see: on an ESP32-C3, C5, C6 or P4, the build stops saying the compiler
riscv32-esp-elf-g++ is not recognised, or not found.
Why: the first download of that compiler was cut off, by closing VS Code, sleep, or a
dropped connection. PlatformIO marked it installed anyway. On Windows, a build started from a
Git Bash terminal does the same, because the compiler's installer refuses to run there.
Fix: close VS Code, delete the folder whose name starts with
toolchain-riscv32-esp in .platformio/packages in your home folder
(C:\Users\<you>\.platformio\packages on Windows), open VS Code again and build.
It downloads again, whole. On Windows, leave VS Code's terminal on PowerShell, its default.
Upload can't open the port, or can't connect
What you see: could not open port, Access is denied, Permission
denied, or Failed to connect.
Fix, in this order:
- Close everything else using the port: the serial monitor (3), SerialWizard, the Arduino IDE's Serial Monitor, another browser tab flashing a board.
- No port at all: try another cable (charge-only cables carry no data), and install the driver for the board's USB chip if Windows shows none: most cheap ESP32 boards use a CH340 or CP210x.
- On Ubuntu, Permission denied means the udev rules from step 1, then logging out and back in.
- Failed to connect: hold the board's BOOT button, tap RESET, let go of BOOT, then upload again.
Windows blocks a compiler program
What you see: a toolchain program, such as riscv32-esp-elf-gcc-ar.exe, is
refused with blocked by your organization's Device Guard policy (error 4551), on a PC
nobody manages.
Why: Windows 11's Smart App Control refuses programs it hasn't seen signed, and
some of the ESP32 compiler's programs aren't signed. You can check it in Windows Security
> App & browser control > Smart App Control.
What to do: it's a Windows security setting, so the choice is yours. Once switched off,
Windows can't switch it back on without being reinstalled. If you'd rather keep it on, build on
another PC and flash the result with SerialWizard.
The first build fails, the second passes
What you see: a design that plays Bluetooth audio with Wi-Fi on an original ESP32 fails
its very first build with an error naming SCons.
Why: these designs have PlatformIO rebuild part of the ESP32 core the first time, and that
first pass can trip over itself.
Fix: click Build again, in the same folder. The export's README.md says more
under PlatformIO.
Anything else, or the board builds and uploads but the screen is wrong: Troubleshooting goes by symptom, and Configuration after the first boot covers rotation, colour and touch.